No products
Viewed products
-

Brompton SA sprocket...
Sprocket set for 3 and 5 speed...
Top sellers
-

Schwalbe 16 inch Inner tube - AV4
Our most popular Brompton 16 inch size inner tube - Schwalbe AV4
£7.64 -

-

Schwalbe Marathon Plus 16 x 1.35 tyre with SmartGuard
The Marathon Plus tyre in 16 inch Brompton size
£39.59 -

Brompton 6-speed sprocket set - BWR - 13/16T
Brompton sprocket stack for Brompton bikes with a 6-speed Sturmey Archer...
£15.00 -

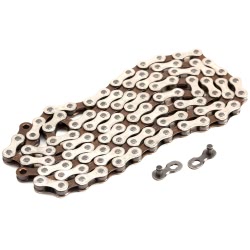
Brompton chain 100 Links 3/32 inch with PowerLink
100 link chain for 2 or 6 speed Brompton with 50T front chainring, or 3...
£16.00 -

Brompton front carrier block
The Brompton front carrier block / luggage mounting block allows you to...
£19.00 -

-

Brompton right hand pedal, non-folding, aluminium cage
Replacement Brompton non folding right hand pedal (silver) with...
£12.00 -

-

Road brake pad inserts from Fibrax - Black
Pair of replacement cartridge brake pad inserts from Fibrax - compatible...
£5.99 -

Brompton Handlebar catch assembly
This replacement Brompton handlebar catch assembly comes complete with...
£7.00 -

Brompton chain 98 Links 3/32 inch with PowerLink
Brompton 98 link replacement chain for 3 speed Brompton with a 50 tooth...
£16.00


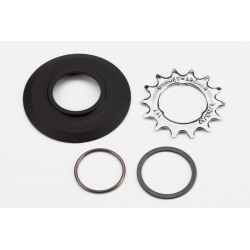
Brompton SA sprocket set 13T for any 3 spline Sturmey Archer
QRSPRSTACK-SA3-13
Sprocket set for 3 and 5 speed Sturmey Archer hubs with 3 spline / ISO fitting
Includes 13T sprocket, plastic chain guard and circlip
We have 25 in stock
More info
Brompton / Sturmey Archer rear sprocket set 13T
Brompton / Sturmey Archer rear sprocket set - 13 teeth - for all 3 spline Sturmey Archer Brompton hub rear wheels
This sprocket set is used on standard C Line Utility 3 speed BSR (Brompton Standard Ratio) Sturmey Archer equipped hub gear Brompton folding bikes
This is the 3/32" sprocket - introduced in 2012 (compatible with all 3 spline Sturmey Archer hubs used on Bromptons) - the 1/8" sprocket has now been discontinued (in 2017)
If you currently have the wide 1/8 inch sprocket, you can change to this sprocket set - you will also need to change the chain (recommended anyway when changing the rear sprocket) The front chainring can handle both 3/32 inch and 1/8 inch, so you will only need to change that if it is worn and generally wears slower than the rear sprocket |
How to remove the existing sprocket
How to install the new sprocket
How do I know if my hub needs a 3 spline sprocket?
The 3 spline / ISO (International Standards Organisation) hub is identified by the three groves onto which the sprocket(s) slide
3 spline Sturmey Archer hubs include (but we are sure aren't limited to - so we would appreciate suggestions) Brompton/Sturmey Archer BSR (Brompton Standard ratio) hub, Sturmey Archer AW hub, Sturmey Archer SRF-3 hub, Sturmey Archer SRF-5 hub
Below is a picture of showing the 3 grooves (or indentations running from outside to inside of the driver) for the splines on the sprocket used on a Brompton / Sturmey Archer BSR hub

From this straight on view it is easy to confuse the 3 spline grooves with the 4 grooves used for removing the hub internals cover
The below picture shows one of the ISO spline grooves on the hub driver

If you have removed your existing sprocket, you see that there are 3 splines on the sprocket and 3 corresponding grooves on the hub driver.
Not sure if this is the right one? Our pictures show both the old, and the new version - both fit - they just require a different chain
The SA-13 sprocket set pack consists of: |
From inside working out - so the order you will install them |
Tools required:
To remove the existing sprocket from the wheel and install the new sprocket you will just need:
- A small(ish) flat head screwdiver (to prise the circlip apart)
- Some brute force (to remove the existing sprocket)
- Some hand cleaner (as you are going to get dirty hands unless you wear gloves)
Which chain is required for this sprocket set?
Chains for this sprocket set are dependent upon the number of teeth on the front chainring:
44T = 96 link chain - QCHAIN096DR
50T = 98 link chain - QCHAIN098DR
54T = 100 link chain - QCHAIN100DR
Brompton Q part code: QRSPRSTACK-SA3-13
Brompton part number: 9024179
Brompton 13T sprocket stack installation sequence
The older steel Sturmey Archer hubs use the supplier no longer supplied with this part, the newer alloy hubs do not
The installation sequence is the same for the 13T and 14T sprockets
1/ Install the plastic chain guard disk
Simply slide onto the hub and push snug to the spokes

2/ Install the 13T sprocket
This simply slides onto the hub driver - lining up the three notches on the sprocket with the three grooves on the hub
The sprocket has a wider part in the centre on one side - this should be facing towards the wheel, it ensures the correct spacing away from the chain guard

3/ Install the circlip
Next up is the circlip - sometimes know as other names such as c-ring
The circlip fits into a groove on the driver, and holds the sprocket stack in place
It's fitted by prising the open part with a screwdriver then manoeuvring onto the driver - it can be the cause of some cursing

When the circlip has been installed, it will have a small gap as shown in the above picture
The tension of the circlip and the fact it is seated in the groove will keep the sprocket set in place
A simple but effective solution
Now you can re-fit the wheel and go for a test ride :-)
Reviews
Good product, great service
Bought as part of a drive train replacement for my 2007 Brompton, the bike is running great now, awesome service from Brilliant Bikes who did the fitting.
- 0 out of 1 people found this review useful.
springy circlip
When fitting the stack start with the black disc , then then spacer / if you have the alloy hub not the steel one this part is not needed , then the cog with the stamped numbers facing out , and the raised edge facing the hub then the dreaded circlip. You can fit this with brute force and a small screw driver leveraging it into place . Took me 5 goes to get it on
- 4 out of 4 people found this review useful.
Have a question?
If your question has not yet been answered here, use the form below to ask something
Related items / accessories


Data sheet
| Origin | Taiwan |
| Comm Code | 87149990 |